
Import from CSV
- Purpose
- Bring records into a module from a CSV file, check the result with a preview, and fix any rows that fail.
- Who is this for
- Admins
- Prerequisites
- A CSV file with a header row and one column that gives each row a unique id.
- Permissions
- Admin role. The Import data button does not appear for anyone else.
Use the CSV import to load many records at once, for example when you move a client's spreadsheets into Gembaa. You match each column of the file to a field, preview what would happen, then run the import. Rows that do not fit are listed so you can fix them without uploading the file again.
How it works
- One file loads into one module. To migrate several modules, import one file for each.
- Every file needs a Row id column: a value that is unique in that file (for example
P-1001). Gembaa remembers it, so a later file can point at those records. - To link records across files, import the referenced module first. Load Staff and Projects before a Risks file that points at them.
- A link that cannot be found makes that row fail, so a wrong order is easy to recover from.
- Imported records follow the same rules as records you create by hand: required fields, field validation and access checks all apply. Each one is recorded in the record's activity as an import.
- A file is limited to 50,000 rows and 50 MB. It must be a CSV (not .xlsx) with a header row.
- Save the file as UTF-8 if you can. A file that is not valid UTF-8 is read as Windows-1252, so accents can look wrong in the preview if the file used another encoding.
- Only one import can run into a module at a time.
Import records
- Open the module's table. Only admins see Import data.
- Click Import data.
- Click Choose a CSV file and pick your file.
- Check the line under the file name. It shows the number of rows and columns, and which separator Gembaa found (semicolon, comma or tab).
- Under Numbers look like, pick
1.234,56or1,234.56. This tells Gembaa which character is the decimal separator. - Under Row id, pick the column that holds each row's unique id.
- In the table of Spreadsheet column against Import into, choose the field each column should fill.
- Optional: leave Don't import on any column you want to skip.
- For a column that links to other records, pick the module its ids belong to under Ids refer to….
- Click Preview. Gembaa checks the file and saves nothing.
- When the preview looks right, click Import.
Gembaa picks the Row id column for you only when a column is called id or key. It pre-fills a match in the mapping table where a column name equals a field name, ignoring capitals.
Choose the number format carefully: 1.234 means 1234 in the first format and about 1.2 in the second.
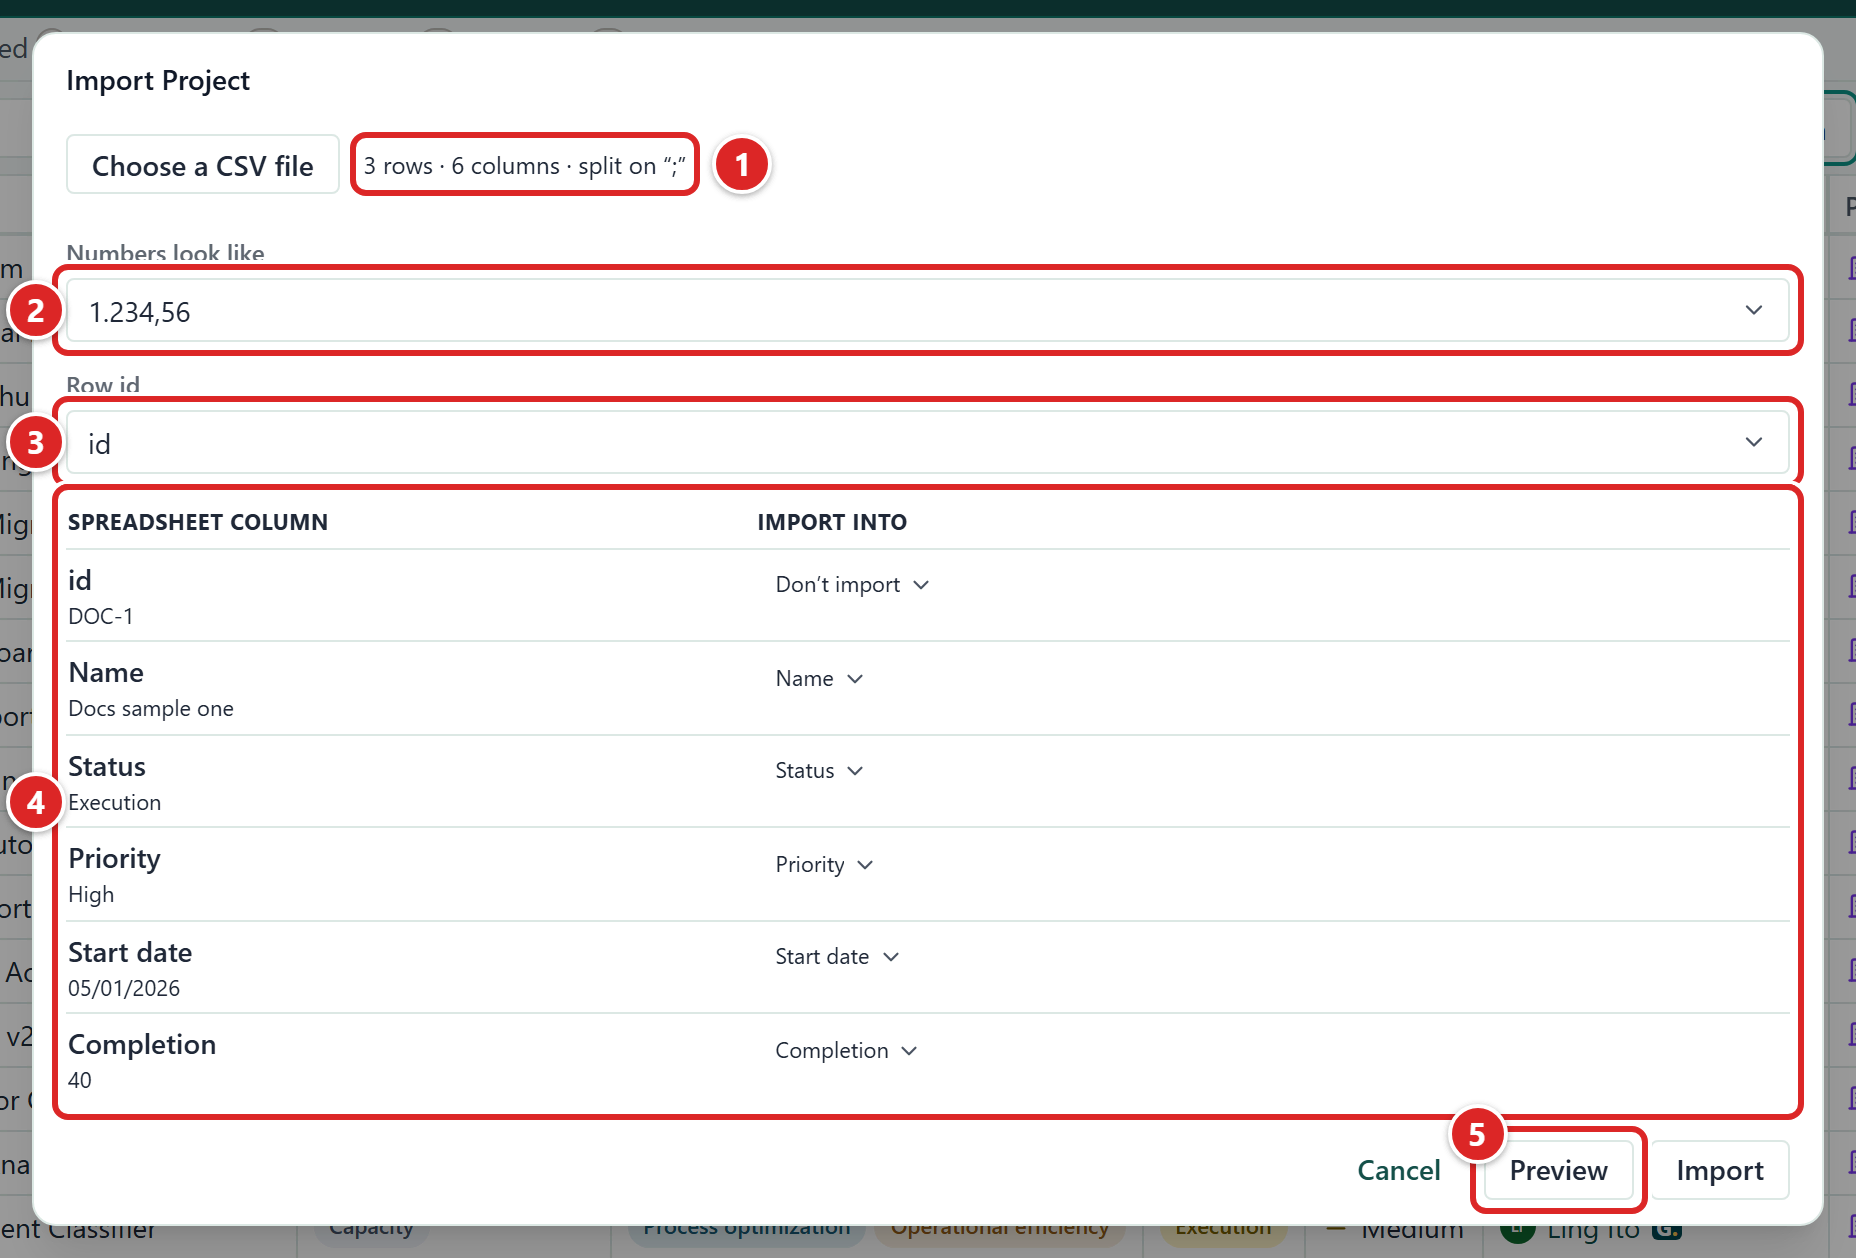
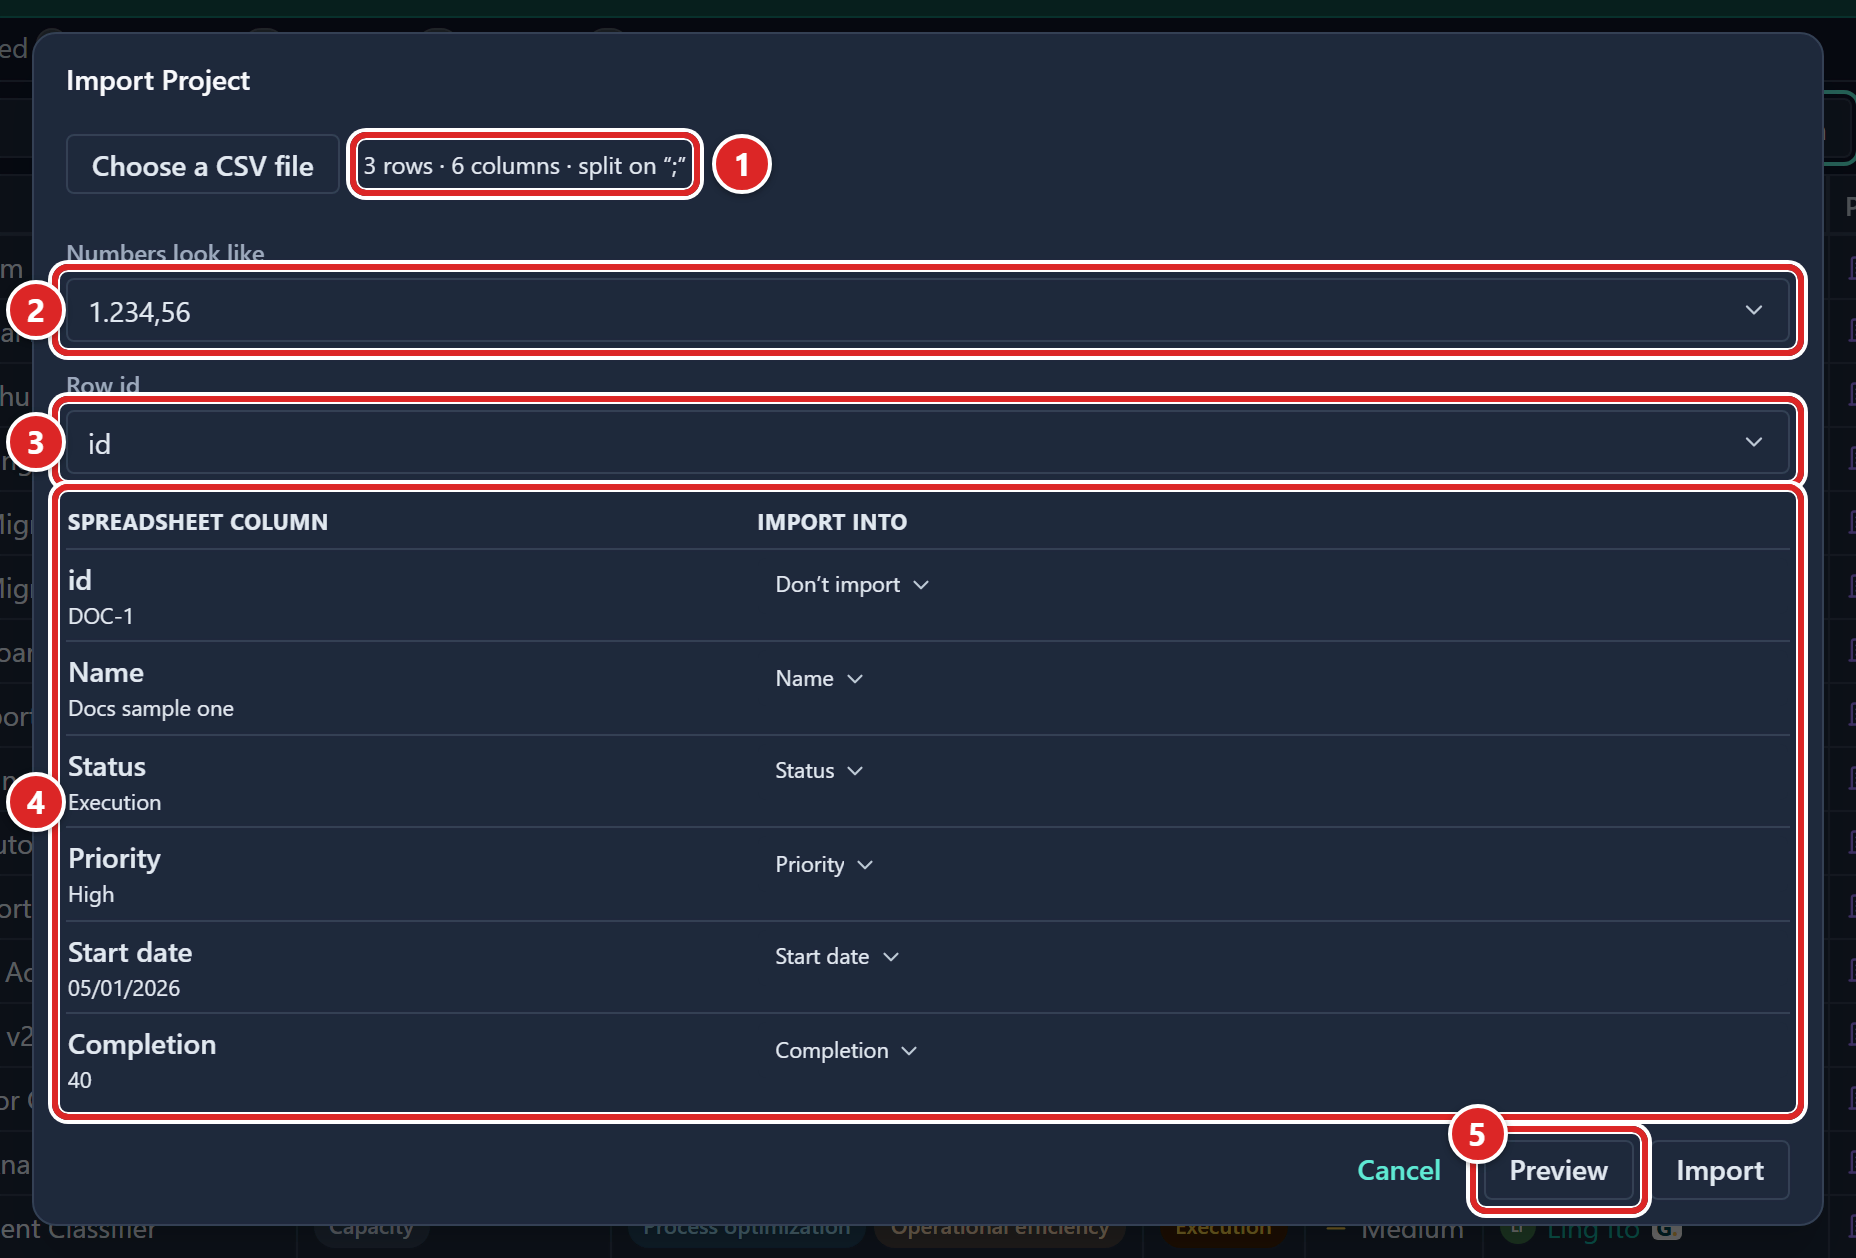
- The summary line: rows, columns and the separator Gembaa found.
- Numbers look like.
- Row id.
- The table of Spreadsheet column against Import into.
- Preview.
Some fields cannot be imported into: calculated fields (formula, rollup), latest Pulse, allocation, current rate, skills, file attachments and read-only fields. They are not offered as targets.
How values are read
| Field type | What the cell can hold |
|---|---|
| Number, progress | A number in the format you chose. Progress must be 0 to 100. |
| Date | A date in your workspace's date format. |
| Date range | Two columns (start and end), or one cell as start|end. Both ends must be mapped. |
| Select, status, priority | The label of an existing option, not case sensitive. Import never creates new options. |
| Multi-select | Several option labels separated by |. |
| Checkbox | true/false, yes/no, 1/0 or y/n. |
| Email, URL | A valid email address or web address. |
| User | The email address of a workspace member. |
| Relation | The row id of the linked record, or several separated by |. Where a field can link to more than one module, write Module:id, for example Project:P-1001. |
Preview and run
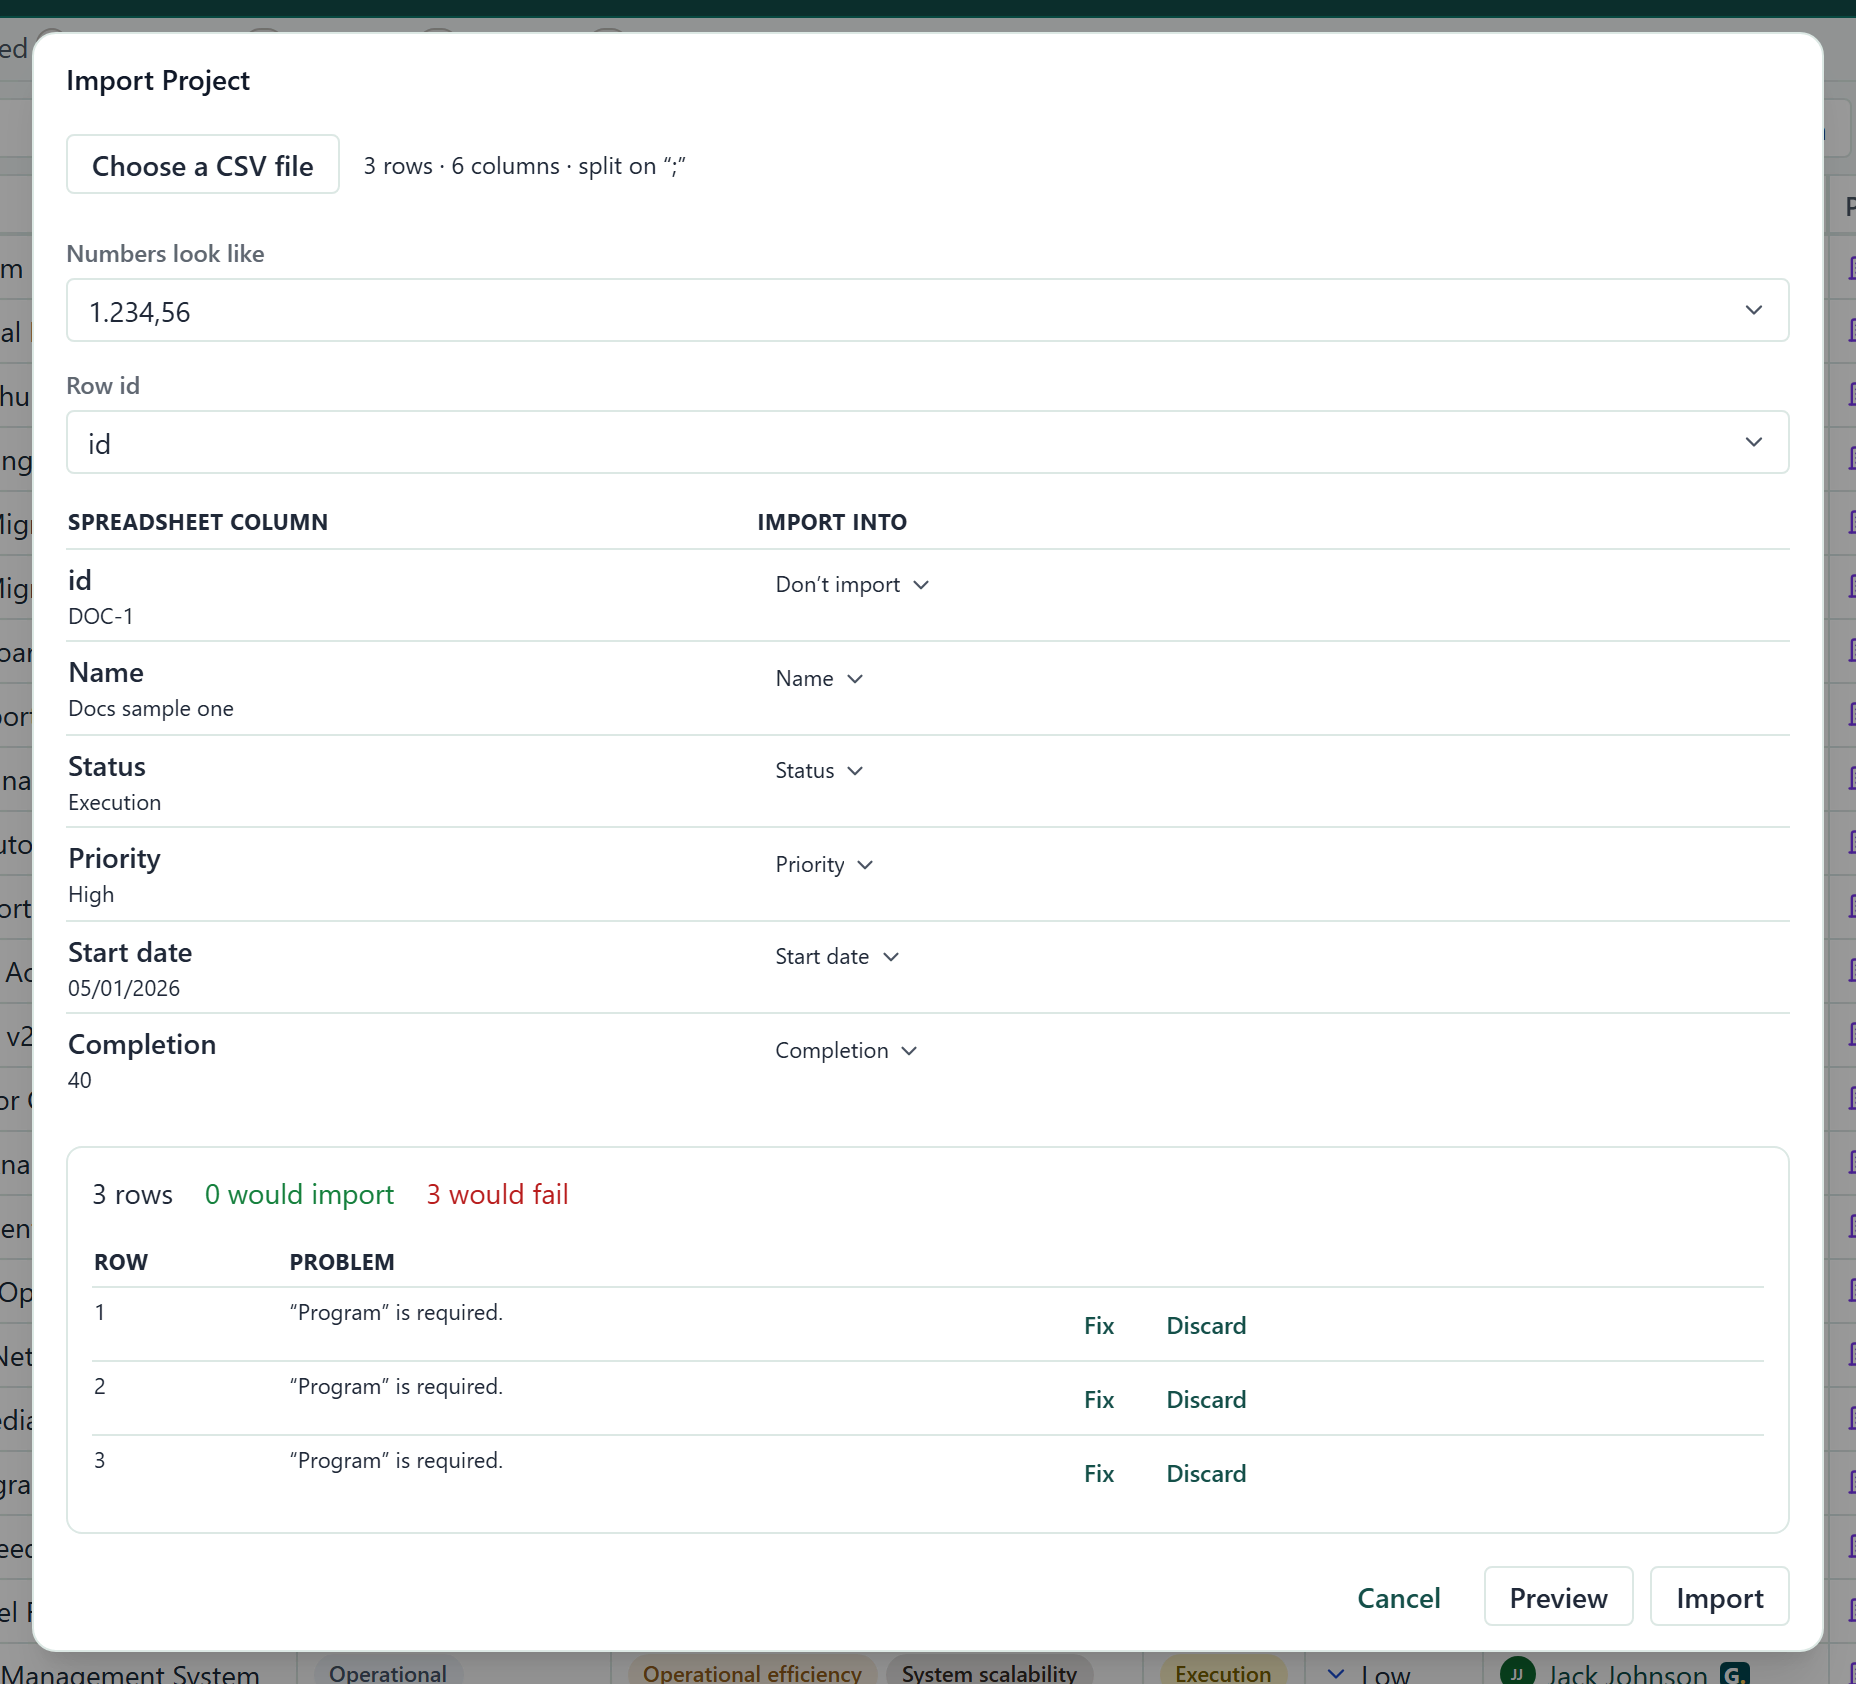
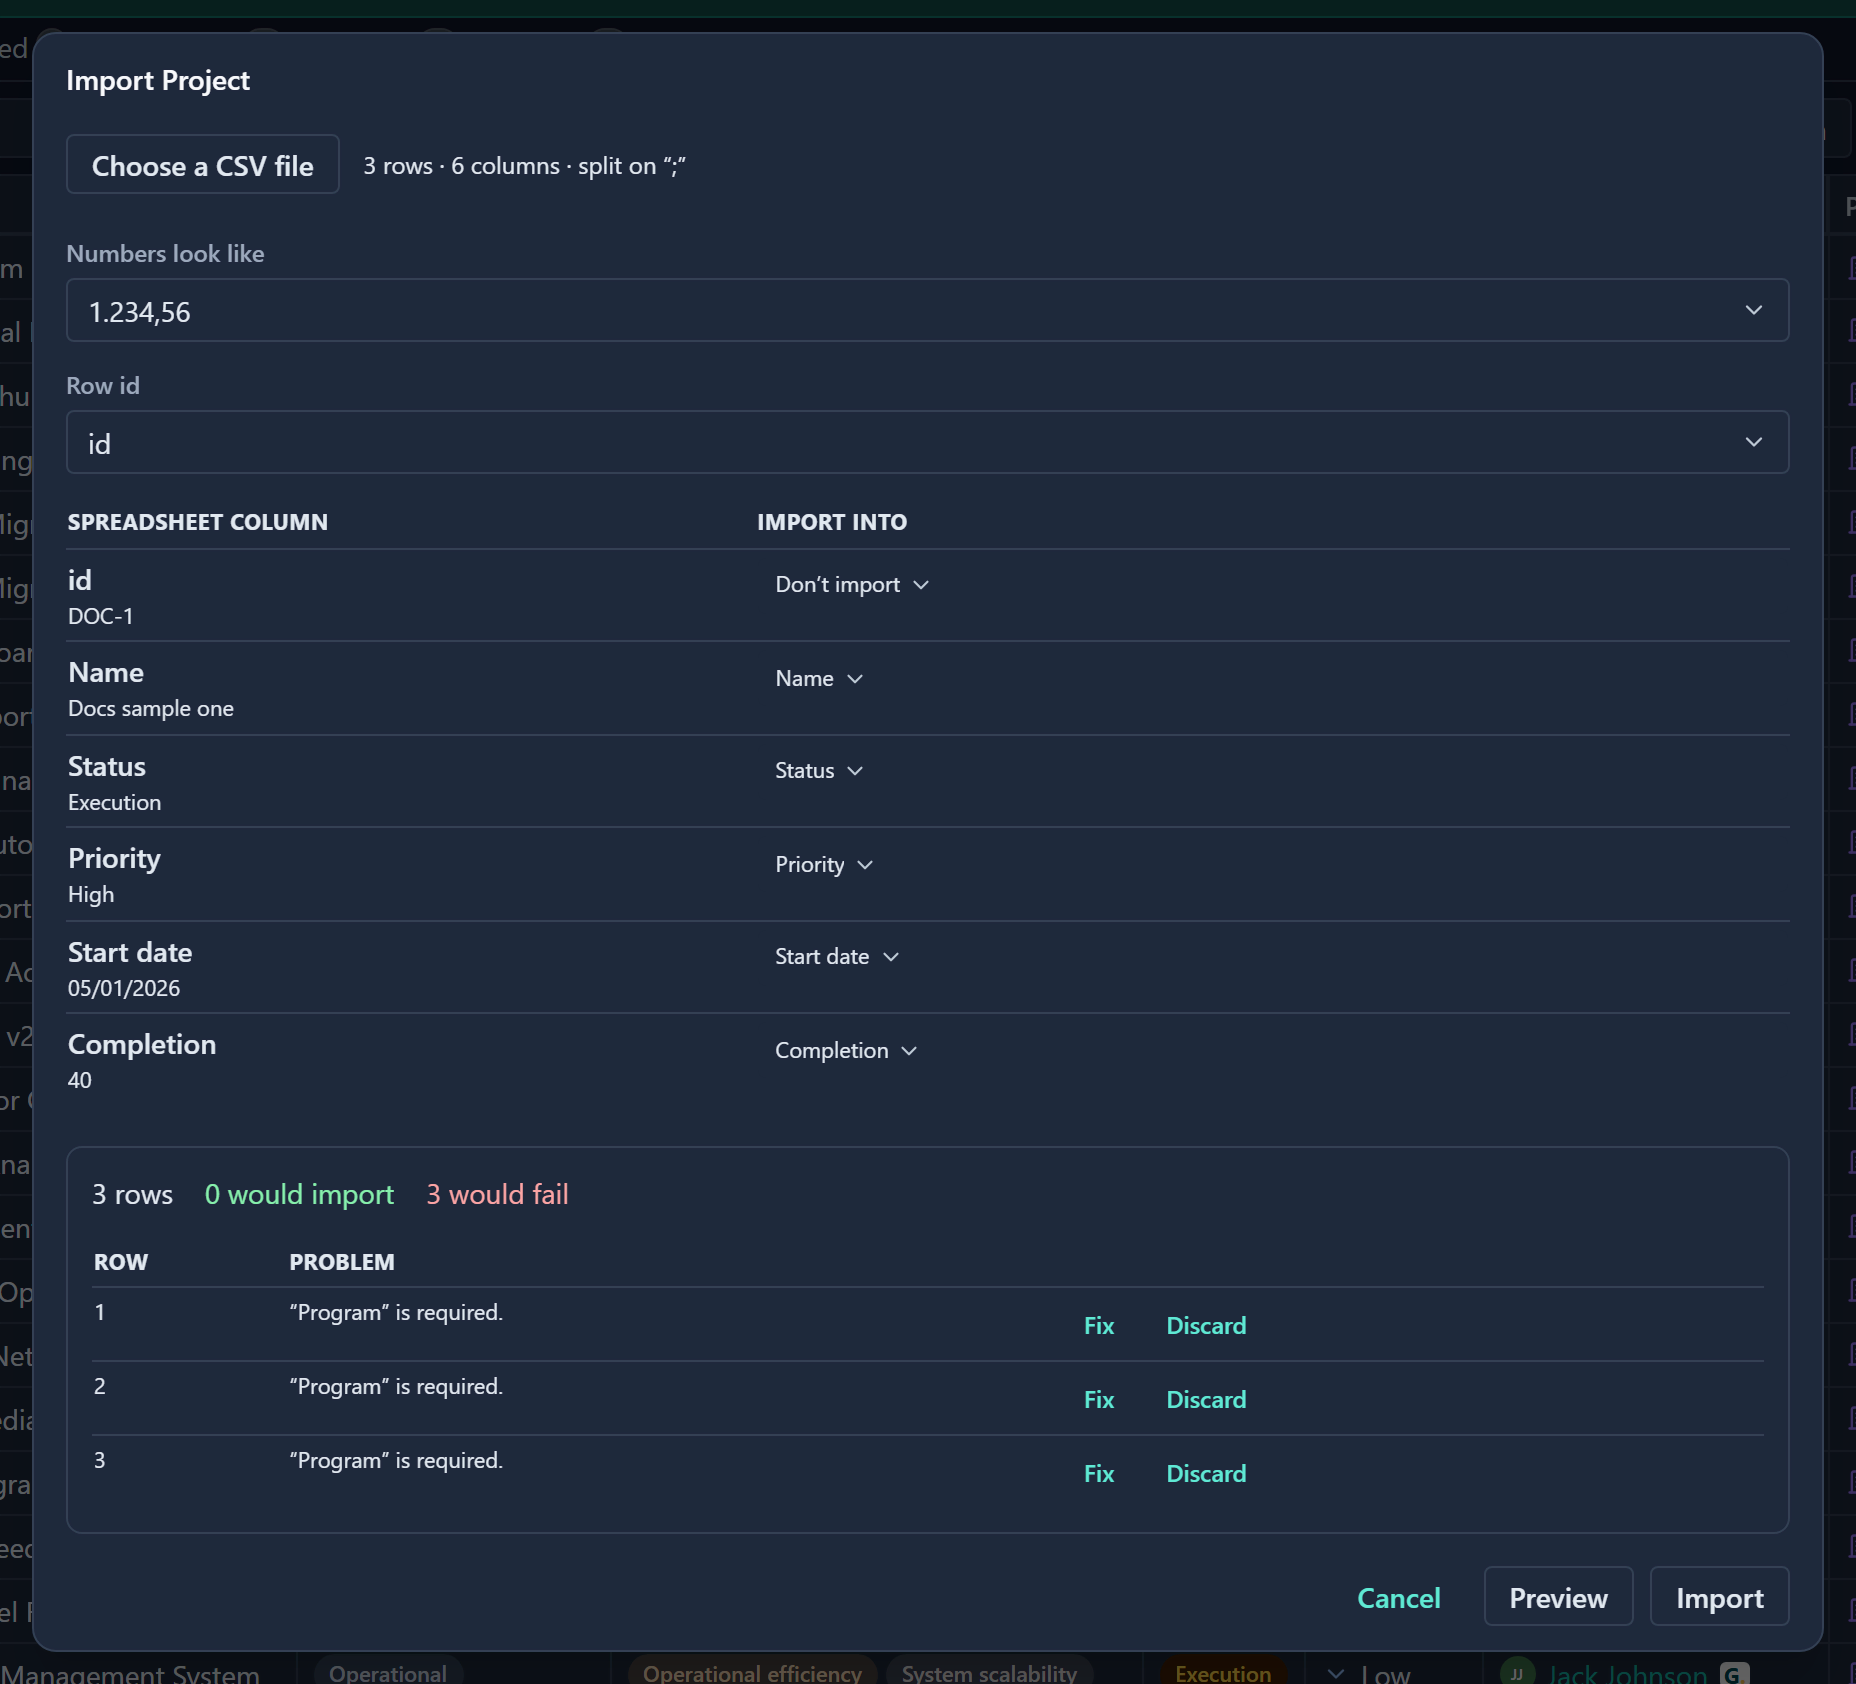
A preview checks every row and saves nothing. When it finishes you see three counts: the total, how many would import and how many would fail. A real run shows the same counts as imported and failed. A green preview means the import will create those rows, unless the data changes in between.
When a real run has no failed rows and no warnings, the dialog closes and a "Rows imported" message gives the count. Otherwise it stays open on the result so you can work through the list.
Failed rows are not half saved. A row either lands completely or not at all.
Fix failed rows
Problems appear in a list with the Row number and the Problem, in the server's own words.
- Click Fix on a row to open its values.
- Correct the values and click Reprocess. If the row now passes, it is imported and leaves the list.
- For a row you will not import, click Discard.
Some entries are warnings, not errors: the record was imported, but an optional link could not be matched. Click Dismiss to clear a warning.
When no errors remain, the dialog says "Nothing left to fix."
Admin imports
Three admin screens have their own import, using the same approach and the same limits. Import the records they refer to first. Each one starts in Administration → Entity & fields.
Import finance data
- Find the Finance card under Staff.
- Click Import finance data.
- Click Choose a CSV file and pick your file.
- Click Preview. Gembaa checks the file and saves nothing.
- Click Import.
The file needs these columns: Staff, Start, End, Hourly cost and the days Mon to Sun. Import Staff first.
Import allocations
- Go to the Allocation tab.
- Click Import allocations.
- Click Choose a CSV file and pick your file.
- Optional: if the file has one column per date, choose what each cell holds under Each cell is: Hours, Days or FTE.
- Click Preview. Gembaa checks the file and saves nothing.
- Click Import.
The file needs these columns: Staff, Project, Role, Scenario, Rate, Unit, Start and End. Import Staff and Projects first. A row for a person whose allocation is disabled, or who is deactivated, is refused with a problem on the Staff column.
Import check-ins
- Find the Pulse card of a module that uses Pulse.
- Click Import check-ins.
- Click Choose a CSV file and pick your file.
- Click Preview. Gembaa checks the file and saves nothing.
- Click Import.
The file needs a Target column holding the record id and one column per indicator holding a health status. Date and Narrative columns are optional. Import that module's records first.
Good to know
- A file with no unique id column is rejected. Add one before you import.
- Changing a record through a later import is not available in the app yet. Importing only adds records.
- The error list cannot be downloaded as a file. Work through it in the dialog.
- If Import data is missing, you are not an admin. Ask an admin to run the import. A non-admin who reaches an import anyway sees "Importing data is restricted to workspace admins."
- If you are an admin and Import data is still missing, CSV import is switched off on Administration → Features. The admin import buttons for finance, allocations and check-ins disappear with it. See Turn features on or off.