
Pulse
- Purpose
- File regular health check-ins on Projects and Programs, and see overall status, trends and overdue updates at a glance.
- Who is this for
- Project and program managers
- Prerequisites
- Pulse switched on for the type of record you want to report on. An admin does this on Administration → Features.
- Permissions
- View access to Pulse on the record to read check-ins. Adding, editing and deleting check-ins needs more than view access: with view-only access those buttons are disabled. Admins switch Pulse on and configure indicators, health status names and cadence.
Pulse is periodic health reporting. A check-in is one dated report on one record, scored across the health dimensions that matter for it, such as Schedule, Budget, Scope and Quality. Over time the check-ins form a trend, so you can see which dimension is slipping and whether things are improving.
How it works
- A check-in belongs to one record, usually a Project or a Program. A record can have as many check-ins as you like. Each one is stamped with the date and its author.
- An indicator is one health dimension. Your admin chooses the indicators for each type of record.
- For every indicator you set a Health status, a Comment and a Forecast (trending up, steady or trending down). This Comment belongs to the check-in. It is not the Comments thread on a record panel, which is a separate feature. See Comment on a record.
- The Overall row is the headline for the whole check-in. You set it yourself, in the same way as any indicator, and add a headline narrative if you want one.
- Statuses show as colours. The colours are fixed. Your admin can rename the statuses.
Pulse is advisory. It shows you what is late, but it does not remind or notify anyone.
Open the page
Click Pulse in the left menu. There is one tab for each type of record that has Pulse switched on, for example Projects and Programs. Each tab shows a count.
Each row is one record. The matrix shows the latest status of every indicator at a glance.
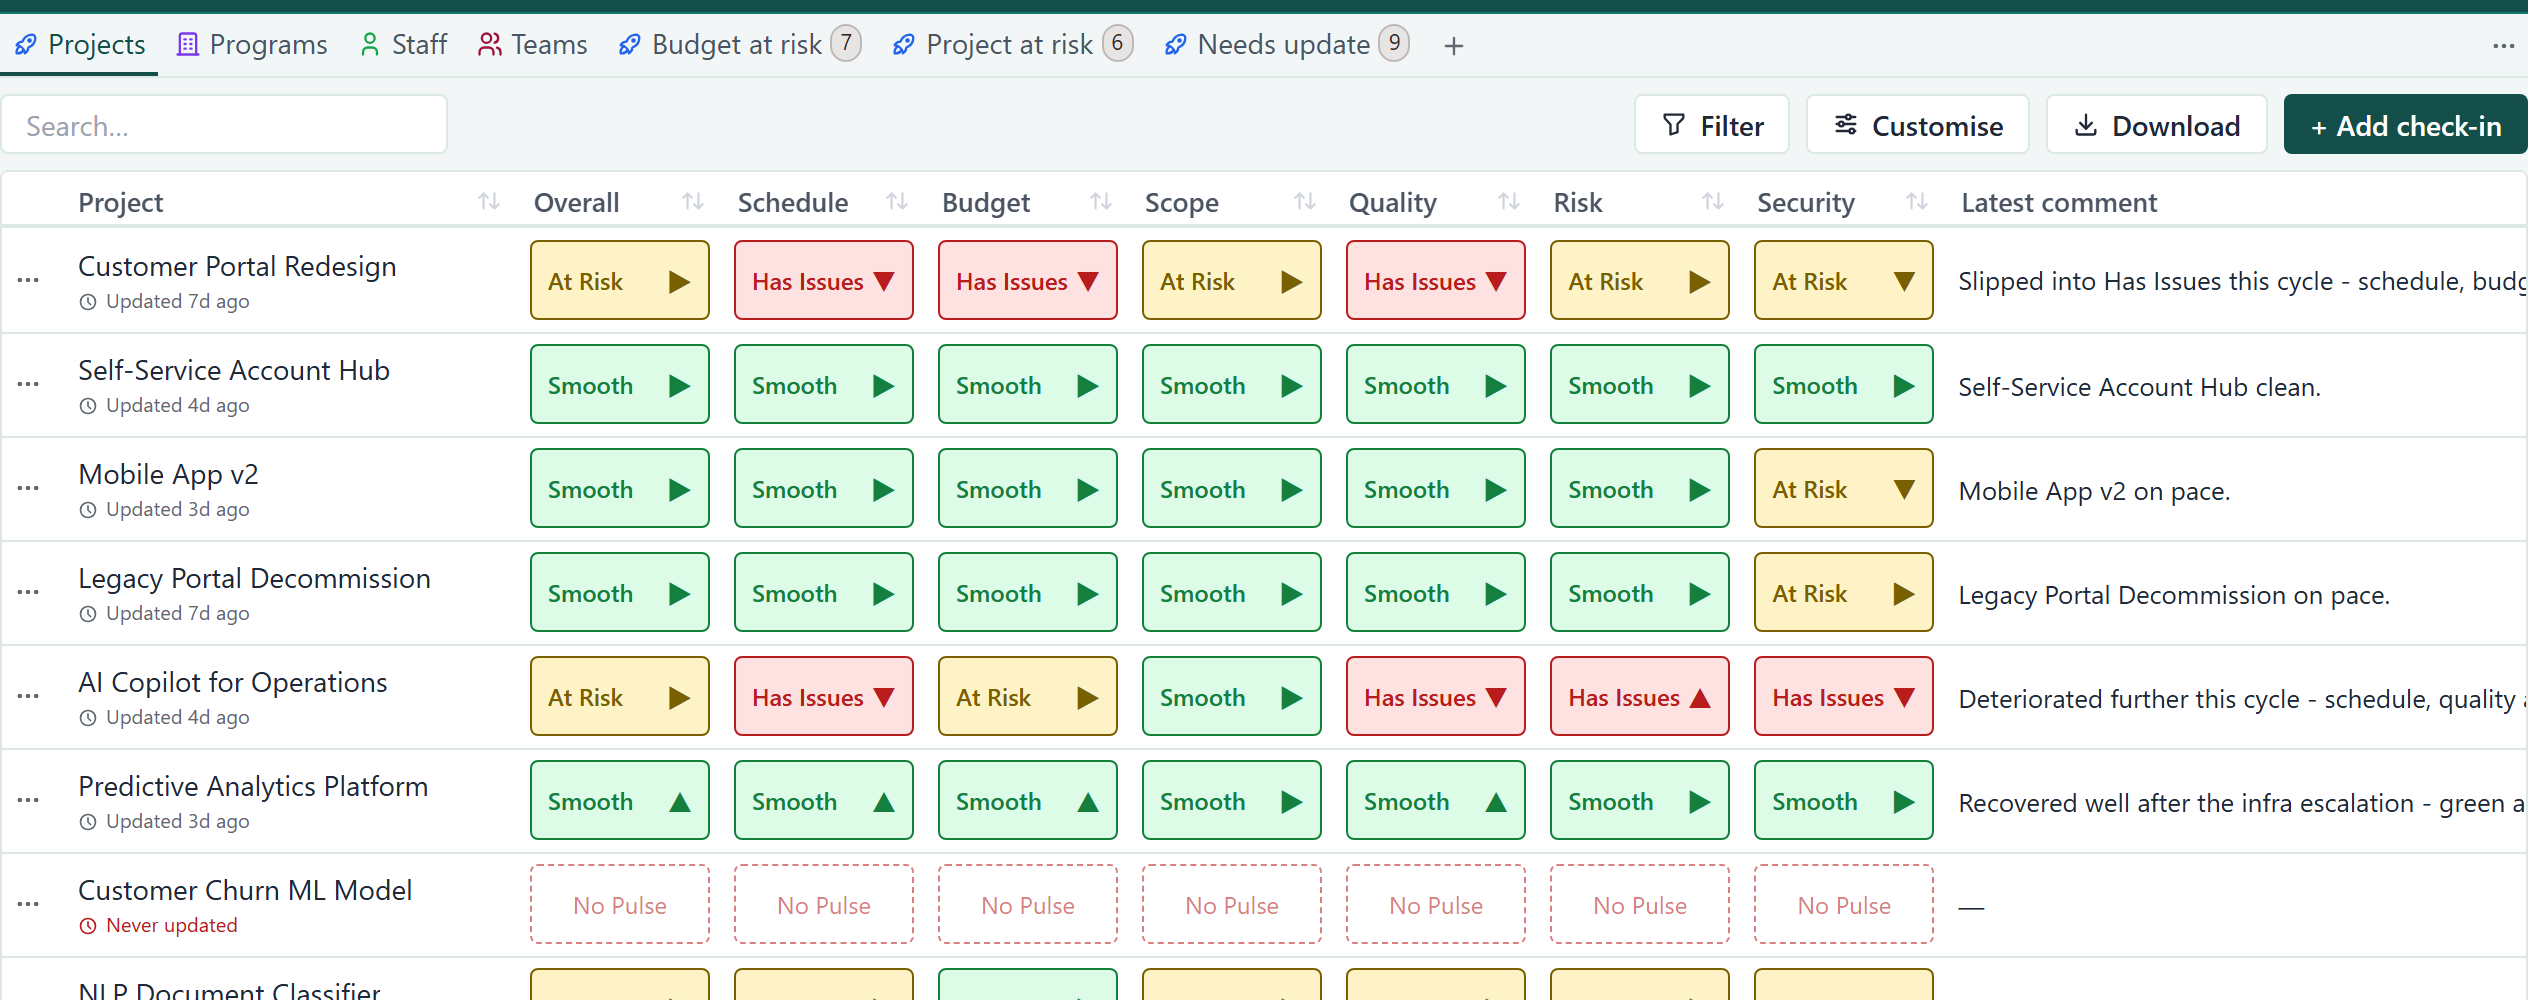
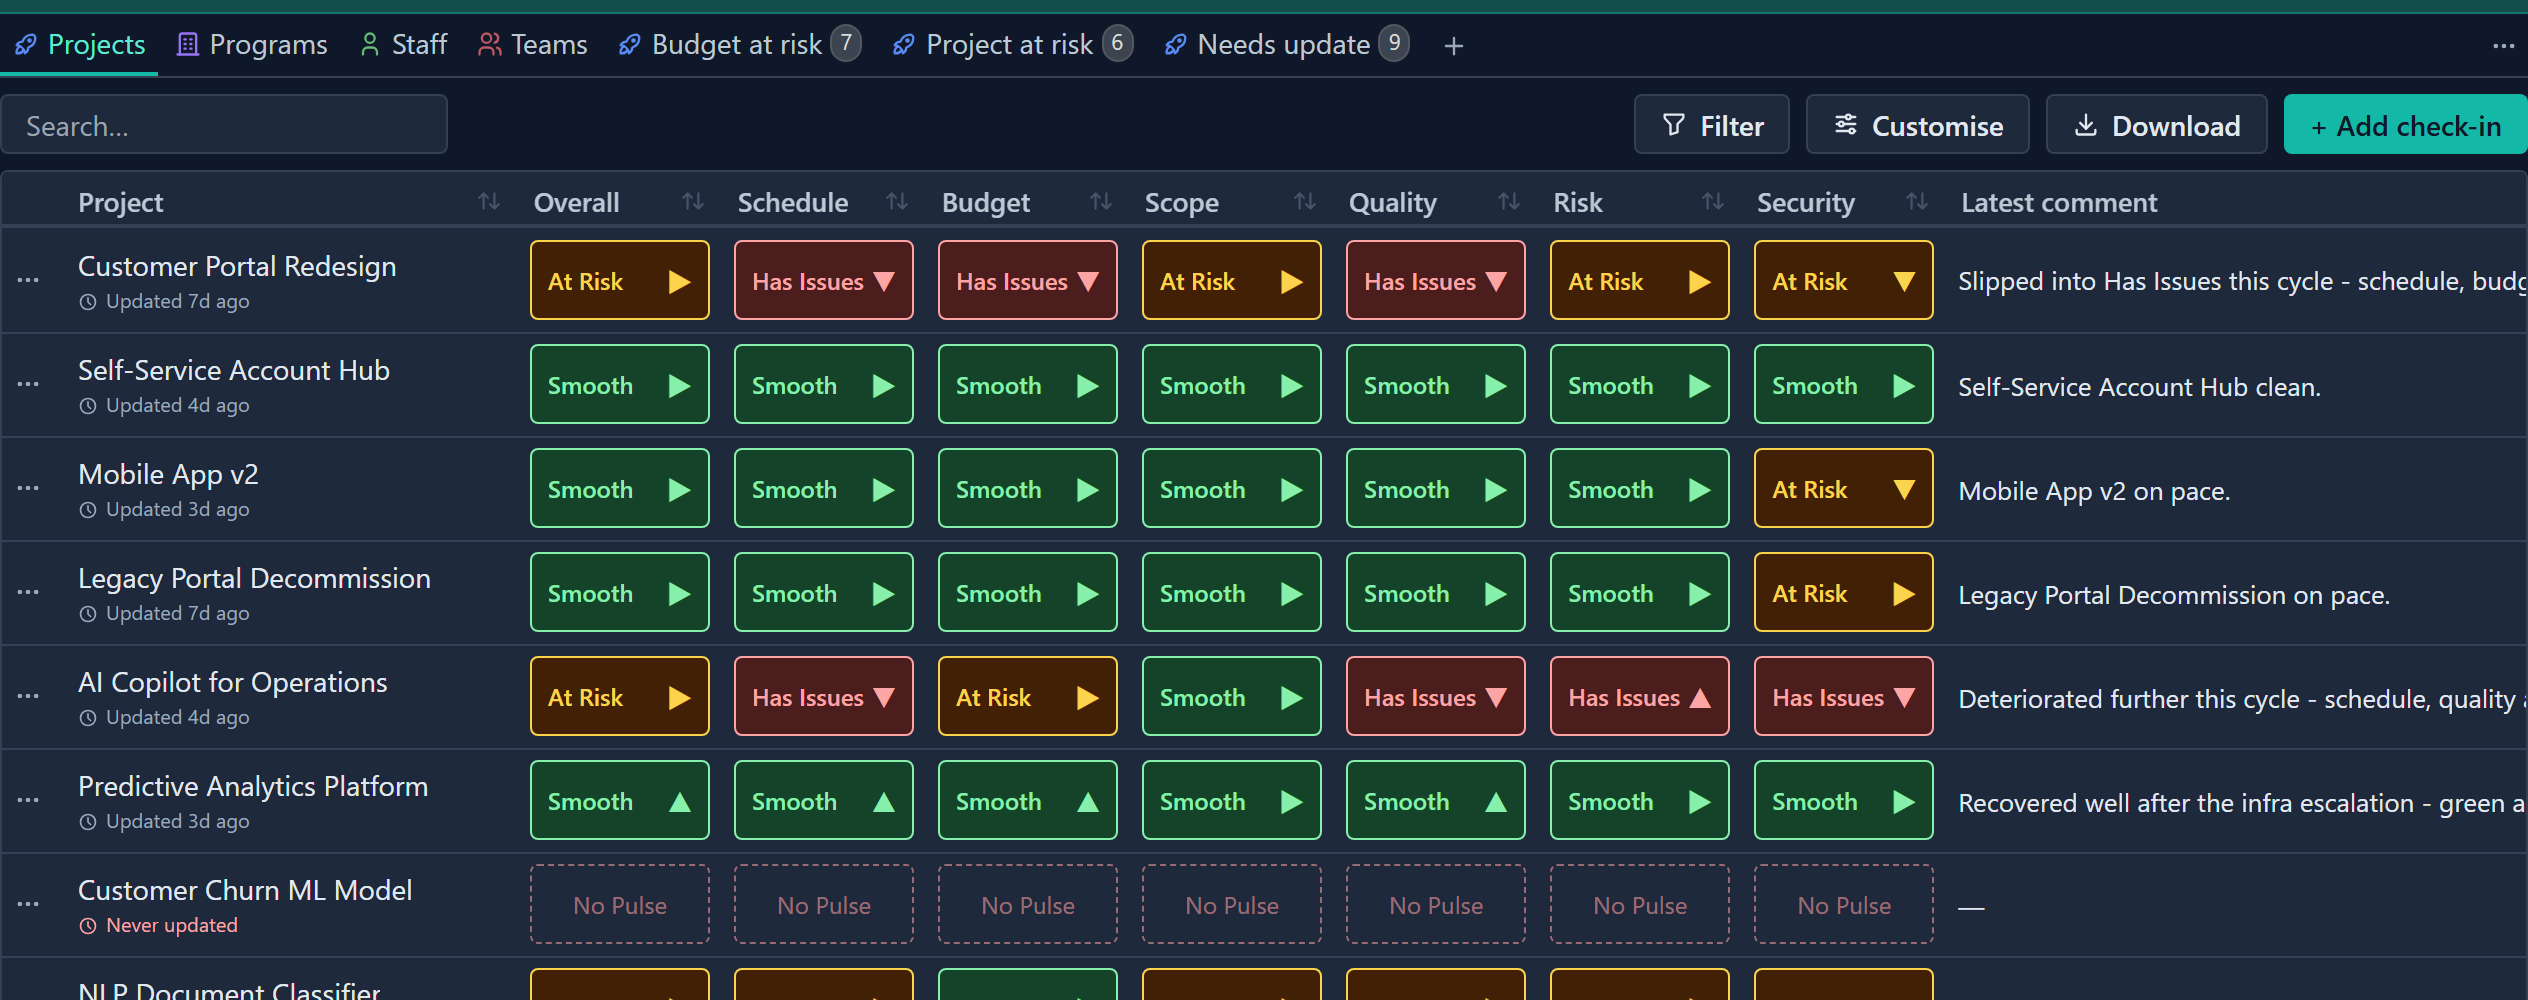
To open a row's menu, click the Row actions button at the left of the row, or right-click the row. Choose Open record or Add check-in.
The columns are:
| Column | What it shows |
|---|---|
| Name | The record, with a line underneath such as Updated today, Updated 12d ago or Never updated. |
| Overall | The latest overall status, with a forecast arrow. |
| Indicator columns | The latest status for each indicator. Hover a cell to read the comment and who filed it and when. |
| Latest comment | The comment from the most recent check-in. |
| Last check-in and Cadence | When it was last updated and how often it should be. Both are hidden until you switch them on in Customise. |
The freshness line is grey when the record is on track, amber when a check-in is due and red when it is overdue or has never been updated. A check-in is due once the cadence interval has passed since the last one, and overdue after two intervals. Overdue rows also show an Outdated badge on their cells.
Use Filter, search, sort and tabs as on any table. See Filter, sort and group and Create and manage tabs. The Pulse filter has these options:
| Option | What it matches |
|---|---|
| Indicator status, with a match mode | Last check-in, Any check-in (the indicator was ever at that status) or No check-in. |
| Freshness, under Last check-in | On track, Due, Outdated or Never updated, matched with is any of or is none of. |
| Comment | The text of comments. |
In Customise, under Cell display, switch Show forecast arrows and Show status labels on or off. Name is always visible there, and you can still move it.
Change a tab's type
Pulse tabs you add yourself can show a different type of record.
- Switch to the tab you want to change.
- Click Customise. The panel shows that tab's settings.
- In the Pulse drop-down, choose the type of record. The panel closes and the tab shows an unsaved change.
- Click Save changes. The type is not stored until you do.
On a built-in tab the drop-down is locked, because those tabs are fixed to their type. If you switch tabs while Customise is open, the panel follows and shows the settings of the tab you moved to.
If no type of record has Pulse switched on, the page says No pulse-enabled entities yet. Pulse is switched on in Administration → Features, not through the Open Entity & fields button the page offers. See Set up Pulse (admins).
File a check-in
- On the Pulse page, right-click a row and choose Add check-in. The check-in form opens for that record.
- For Overall and for each indicator, choose a Health status and set the Forecast.
- Optional: Add a Comment.
- Click Add.
The check-in is dated and added to the record's history. The row updates and the due or overdue signal clears.
To start without a row, click Add check-in in the toolbar and pick the record first.
Read history
Click a row, or right-click it and choose Open record. The record panel opens on its Pulse tab. It shows:
- The latest check-in: overall status, forecast, headline narrative and when it was last updated.
- A check-in selector with Previous check-in and Next check-in. Each entry shows its date, how long ago it was and who filed it.
- The per-indicator breakdown for the selected check-in. You can sort it by Status, which puts the worst first.
- An overall trend over time, and a grid of indicators across time to spot which one is slipping.
When a check-in is due or overdue, a banner above the history says so. It says nothing when the record is on track, or has no check-ins yet.
To change a check-in, select it in the history and click Edit. To remove one, click Delete and confirm in the Delete check-in dialog. Deleting cannot be undone. With view-only access to Pulse, Edit, Delete and Add are disabled.
Copy the last check-in
When most of the picture has not changed, start from the previous report.
- Open the record's Pulse tab.
- Click Add next to the check-in selector.
- Choose Copy last check-in. The form opens filled in. The other choice, Add check-in, starts blank.
- Change what is different and click Add. The new check-in appears in the history.
The copy always comes from the newest check-in, whichever one you are looking at. It carries every indicator's status, forecast and comment, the Overall row and the headline narrative. It still creates a new check-in and leaves the old one as it was.
Show Pulse in a table
Admins can add a Latest pulse field to any record type that has Pulse on. See Entities and custom fields. It shows the latest check-in as a row of coloured squares, one per indicator (Overall can be one of them), or as a single status pill if only one item is chosen.
- Hover it for the comment, the forecast and who filed it.
- A clock after the squares means the record is overdue.
- The field is read-only and changes only when someone files a check-in.
- It cannot be sorted, filtered or grouped, and exports as text.
The same column can be added to a table widget on a Dashboard.
Set up Pulse (admins)
Pulse is switched on for each type of record on Administration → Features. The Pulse card on the Entity & fields page holds the indicators, status names and cadence.
Switch Pulse on
- Go to Administration → Features.
- Under Pulse, switch on the type of record you want: Projects, Programs, Staff or Teams.
- Click Save.
The type needs at least one indicator before Pulse can be switched on. If it has none, add one first (next section).
Switching Pulse off hides the Pulse tab on that type's records and its check-in entry, and Gembaa refuses new check-ins for it. Existing check-ins are kept and return when you switch Pulse back on. See Turn features on or off.
Set indicators and cadence
- Open Administration → Entity & fields.
- Open the entity, for example Project.
- In the Pulse card, click the pencil (Edit). The badge in the card header reads Enabled or Disabled. You can edit the card either way.
- Under Indicators, click Add indicator.
- Optional: Rename an indicator.
- Optional: Drag an indicator's handle to reorder the list.
- Optional: Remove an indicator you no longer want. All indicators count equally.
- Optional: Under Health statuses, rename a status. The new name shows everywhere. The colours cannot be changed.
- Under Default cadence, choose Weekly, Fortnightly, Monthly or Quarterly.
- Click Save settings. Saving does not switch Pulse on or off.
The cadence applies to every record of that type, and it decides when a check-in is due or overdue.
To load check-in history in bulk, click Import check-ins on the Pulse card. See Import from CSV. The button is hidden while CSV import is switched off.
Pulse can also be a data source for Dashboard widgets.
Good to know
- With no check-ins, a record shows as not assessed and Never updated.
- Changing indicators affects new and edited check-ins. Older check-ins keep what they were filed with.
- A link from a dashboard widget opens the page already filtered, with a Filtered from dashboard chip. Clear it to see everything again.
- If you cannot view Pulse for a record, its cells appear masked.